Tuesday 2 March 2021

Sometimes wildlife does things we didn’t think it would do

Sometimes wildlife does things we didn’t think it would do.

Take birds and nest boxes for example.  The conventional bird box is one that is square or rectangular, made of wood and secured somewhere where predators cannot get.  But would a bird be prepared to nest in something not so conventional.

You see I discovered something last summer year which surprised me and which prompted me to ask this question and then to carry out an experiment.

In our mixed hedge, a small bird had made a nest and successfully reared some young in a small hamster house I had left in there earlier in the year.  This made me wonder what strange and quirky things would birds be prepared to make their home in.

This hedge runs between our orchard and the field next door.


I'd better start at the beginning ...............

My daughter was sorting out all the bits and pieces she had accumulated over the years for her pet guinea pigs. In amongst all the spare water bottles, food bowls and hay dispensers she found a two-storey wooden hamster house.  She was going to throw it out but I stopped her and asked whether I could have it for a bird box.

After scrubbing it with disinfectant and letting it fully dry out. I used some spare wood to enclose two sides of the upper storey and which made it a two compartment nest box.  I then wired it into our hedge (the one between us and the field next door), but as it was May I was only expecting it to be used a roosting box. 


Then one day in about July I was walking past the same part of hedge and was quite surprised to see some beaks and fluffy heads sticking out of the hamster box.  I am not quite sure what birds they were but eventually they fledged.  This gave me the idea to experiment on what type of containers birds would be prepared to nest in.

I put together a variety of nest boxes to see which one would be favoured most. 

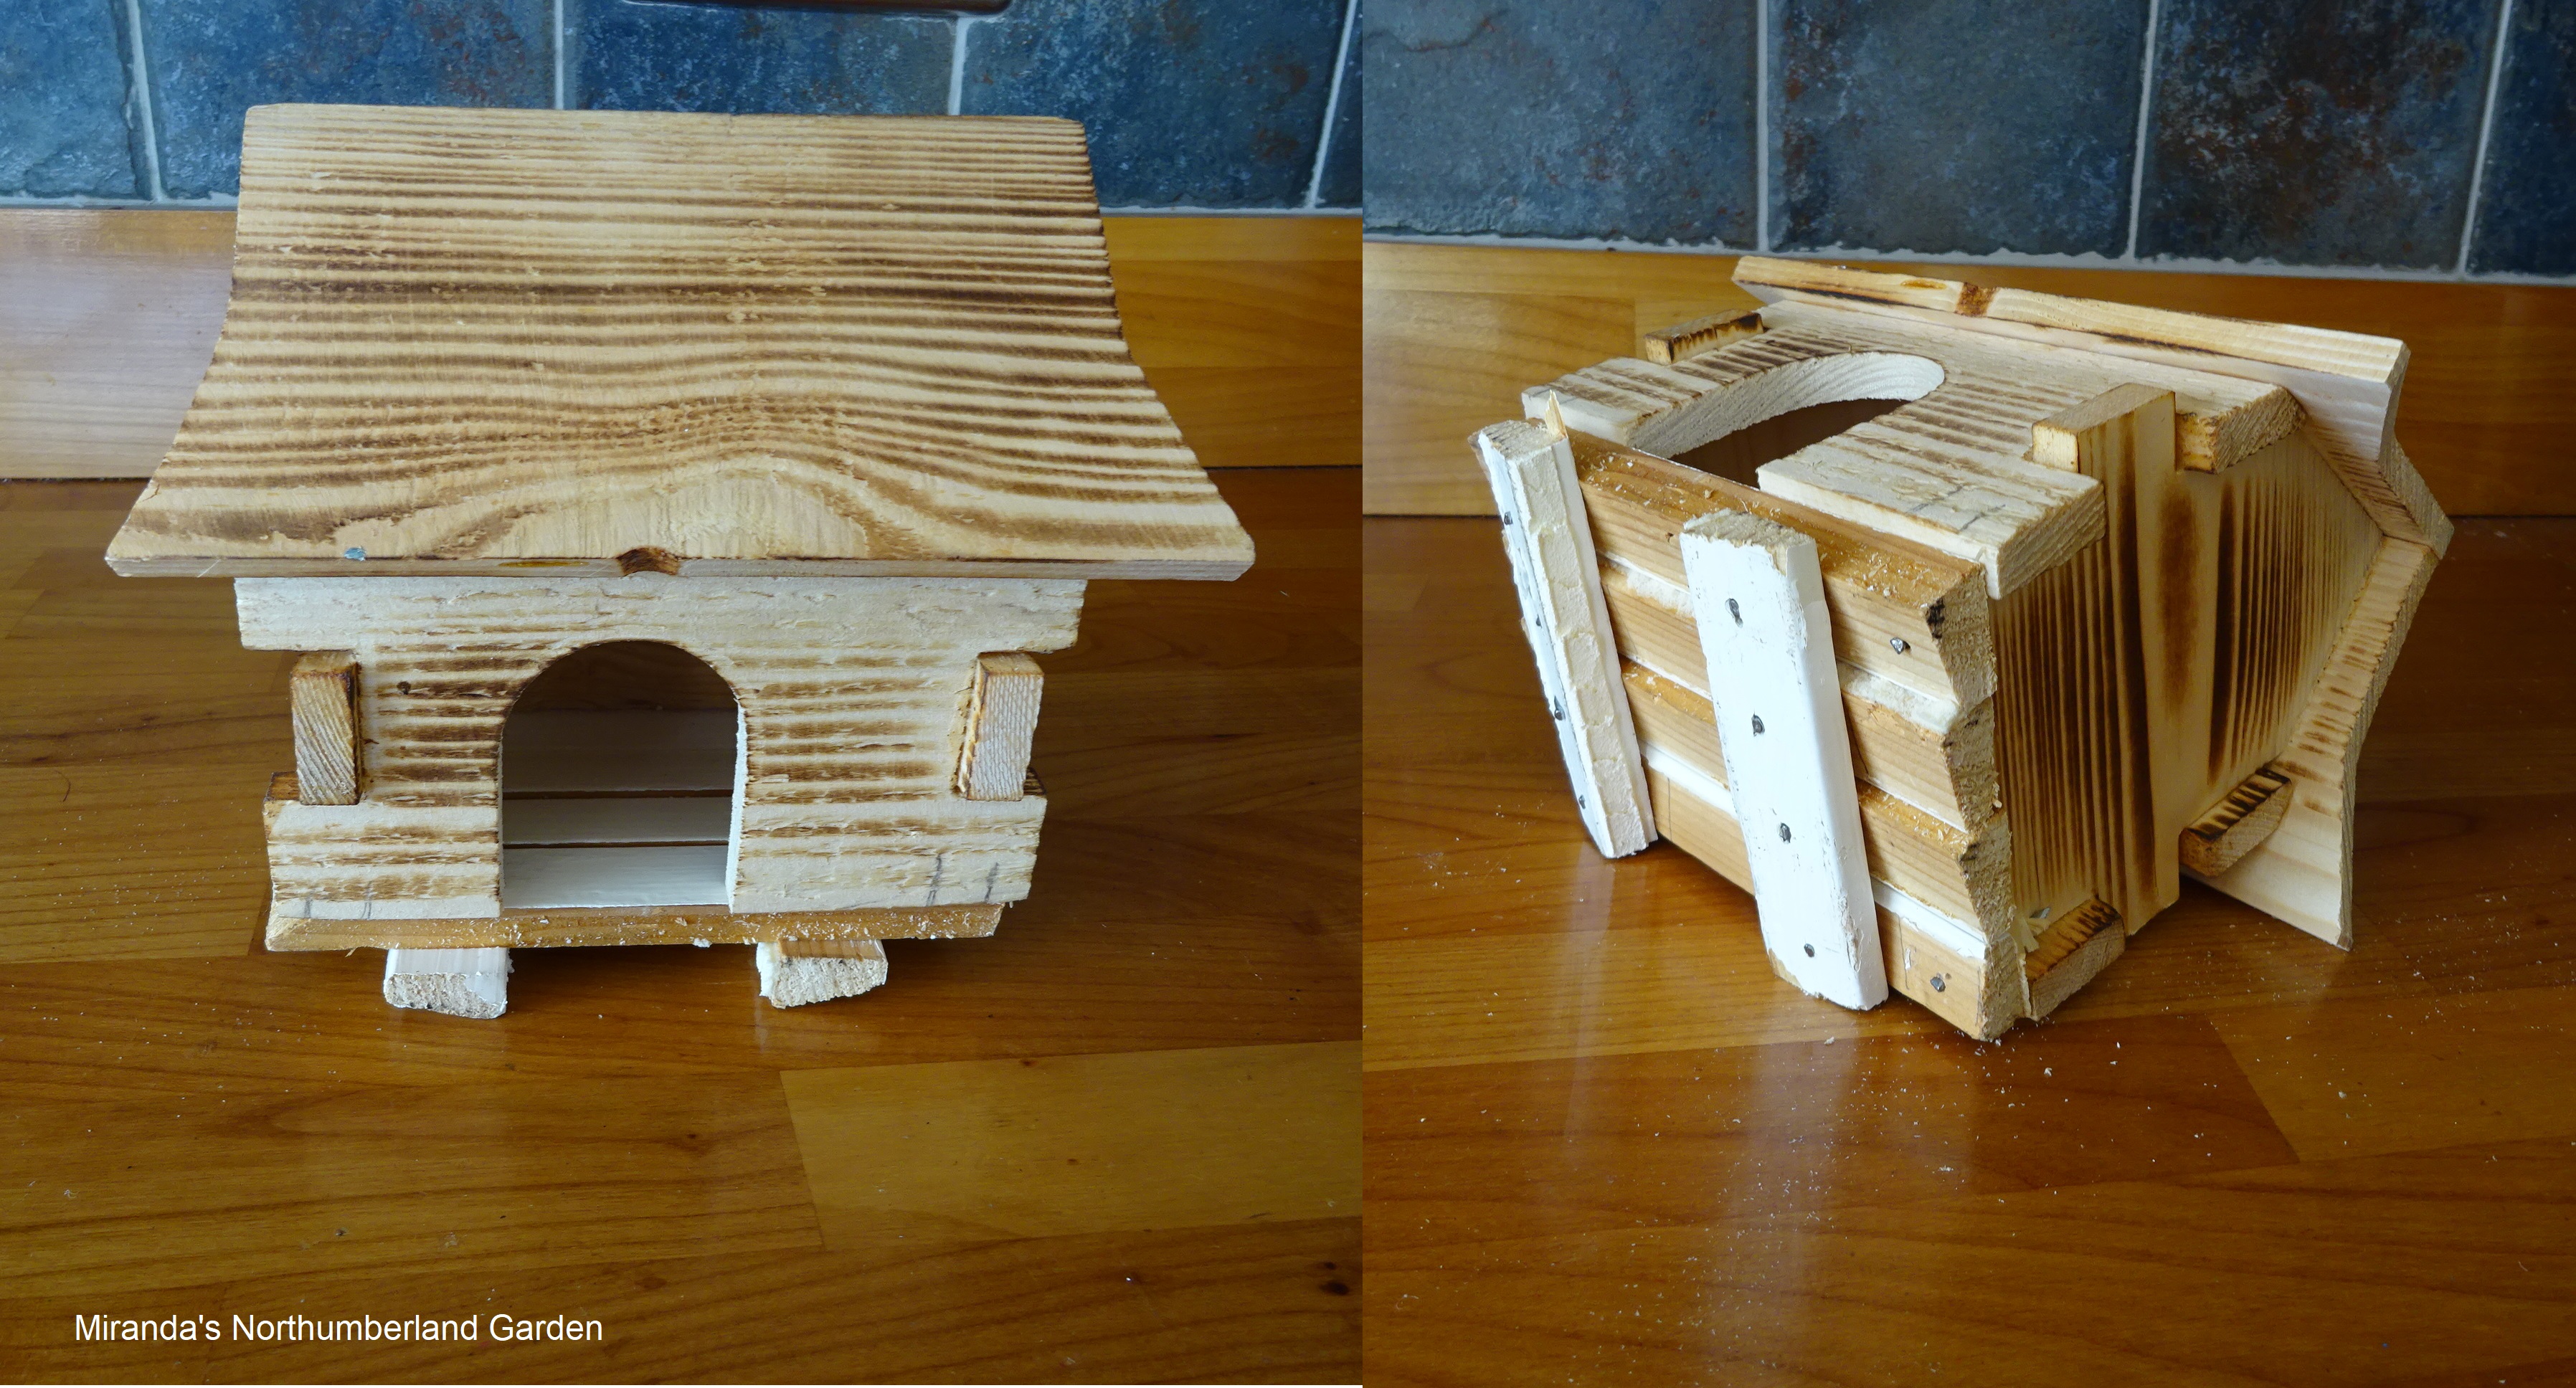
Here are the four nest boxes.


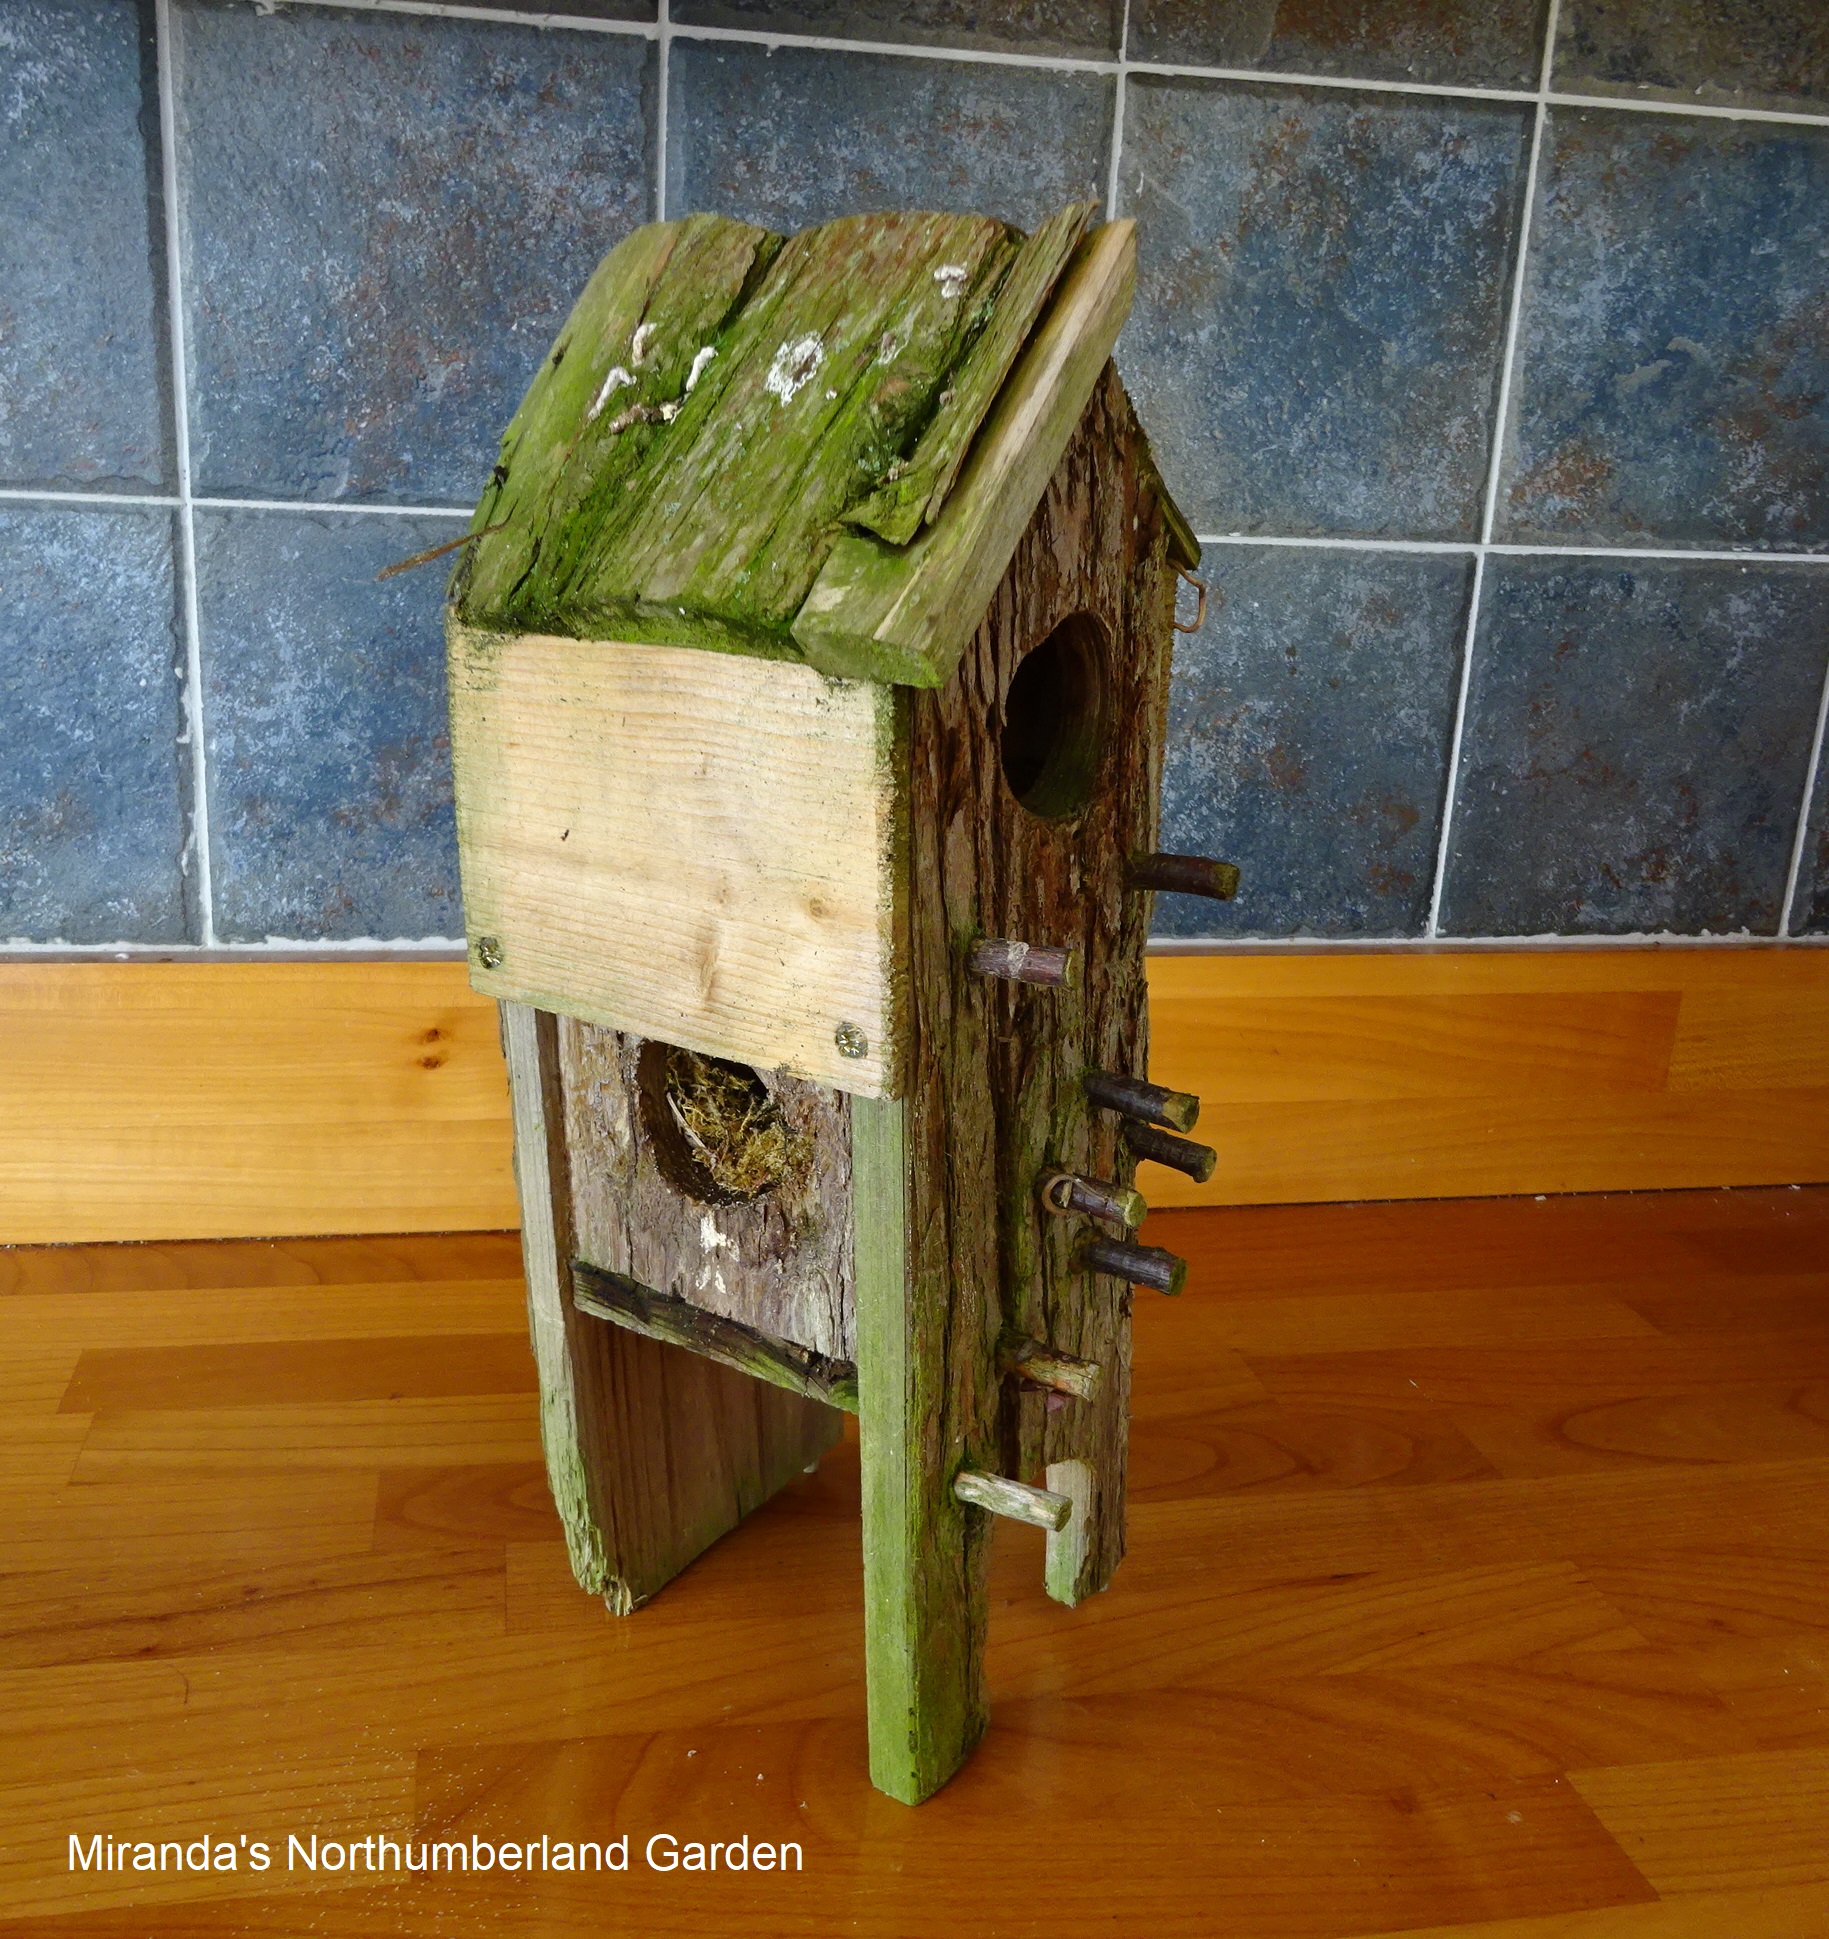
On the far right is the original hamster house which my daughter nearly threw out.  In the picture below you can still the remnants of last year’s nesting material.


Second from the right is a hamster house bought online for a few pounds.  You can see that I gave it a new floor using off-cuts of wood.


The two rectangular boxes are not very expertly or carefully made; my carpentry skills were learnt doing CSE woodwork at school in the late 1970s

The nest box with the light yellow roof is crudely made out of old skirting board and held together with large panel pins, T very kindly cut the access hole and the landing stick is a section of used firework rocket stick.


The largest box is made out of off-cuts of tall skirting board (you can see the profile of the skirting board in the second picture) and some spare bits of wood which I found in the garage.  Again the landing perch is made of used firework rocket stick and T cut the access hole.


I secured each box with garden wire deep into the hedge in a stretch which is in full view of the lounge and kitchen windows.


Now I am waiting to see what happens.  As it is only February it will take a while for the smell of humans to disperse and for the birds to get used to the boxes being there.

I’ll keep you informed of developments.


Thursday 18 February 2021

Jam Making in Winter!!!!!

With the weather being so miserable outside, I often take the opportunity to do what I call “Inside jobs”.  You know the sort of thing, anything indoors which needs mending, rooms redecorated, cupboards cleared out.  The contents of the deep freeze is a good example, I have one shelf stacked with frozen soft fruit picked from the garden.  This frozen produce is used throughout the year in pies, crumbles and summer fruit puddings but just occasionally we have too much and by the beginning of the following year there is too much frozen fruit and not enough space.

 As you can see from the two photographs some frozen produce had been in the freezer for longer than I planned.  Once defrosted the fruit is safe to eat and to cook with. 


Not only did I have raspberries and tayberries which were grown and frozen in 2019 but I had frozen some blackberries in a plastic bag and failed to write a date on the bag. 


In our household, one of the food stuffs which I can guarantee will definitely get eaten is homemade jam and these three fruits will make a beautiful mixed berry jam.

Once defrosted I simply weigh the fruit including the liquid, make a note of the weight then tip it into the preserving pan; by the way I find it always defrosts to a semi solid/semi liquid state.


Then using a low heat the fruit and liquid is heated up and cooked through until the fruit is soft.

 Whatever the fruit and liquid weighed I then measure out an equal amount of preserving sugar.


I then add the preserving sugar to the cooked fruit and heat it over a gentle heat; I stir the jam mixture occasionally until all the sugar crystals have dissolved.  Once I am sure that no sugar crystals remain I turn up the heat and bring the mixture to a boil and boil it rapidly for about 5 – 7 minutes or until setting point is reached.


Lastly, I leave the jam to cool slightly, this gives me enough time to sterilise some preserving jars. I bottle the jam in the usual way and, of course, put wax discs on the surface to create a seal.


Delicious mixed berry jam to enjoy during the coming months – and a slightly emptier deep freeze.


Sunday 7 February 2021

Dreadful Weather but not in the Glasshouse

Here in Northumberland for the last three weeks we have had continuous torrential rain, gales and heavy snow fall.  The garden is sodden everywhere, it squelches when I walk to the guinea pig shed, even in the fruit cage where the ground is covered in a thick mulch of composted woody shreddings I can feel the ground is saturated.  I feel I really should be doing something horticulturally related in order to lift my spirits. Obviously doing anything outside is out of the question so I decided to sort out my glasshouse.  I do this annually generally in about April but this year I might as well to do it a bit earlier and I thought you might be interested to see what I do in order to maintain the plants in this artificial environment.

This gloomy picture taken from the bathroom window looking east doesn't inspire me to do anything except stay indoors.


Yes, I know, it looks quite a mess.  Dead leaves and fern fronds litter the floor; everything needs to be checked for signs of decay, dead leaves cut away and checking which plants need to go into bigger pots.


On the left near the door there is a fern, I’m not sure of its name but it’s been in that spot for a few years and it seems very happy, the dead and half dead foliage just needs to be trimmed off to make room for new growth.


Next I have two Vietnamese coriander plants which are still in the plastic pots they were in when I bought them from the garden centre.  Apparently they are very vigorous, so they just need to go into bigger pots with fresh compost. I bought these because of their tropical appearance but I should really try using them in cooking.


Next is Zantedeschia, only a few straggly leaves need attention. 

This is one of many small Musella lasiocarpas I have (hardy Golden Lotus banana).  Again dead leaves are removed and they are checked to see if any roots are bursting out of the bottom, if so into a bigger pot they go.


As you can see from this picture Hedychium aurantiacum has outgrown its pot – so needs repotting.


This Eletaria cardamomum, bought from Edinburgh Botanic Garden a few years ago, needs a trim and it’s good enough to go back in the border.

Not so for the Monstera deliciosa, as you can see its roots are badly congested, a few minutes later and a happy plant.


This corner is jam packed - in the front there is a potted Geranium maderense, which I brought in for the winter as in previous years I’ve lost them. 


Behind is a Bougainvillea in winter dormancy, also in this group of pots is an avocado which I grew from seed and at the back on the far right is a Cestrum elegans and an abulilton.


This rabbits foot fern (Davallia canariensis) is growing quite happily in a large plastic aquatic basket, I find these pots are ideal for aerial plants. 


Underneath there is another fern growing through a painted bamboo seat.


Both ferns look a whole lot better after a haircut.


After I had finished the glasshouse was tidy and every plant looked a whole lot better.  All that was left to do was to cover all exposed compost with Strulch.  I find Strulch deters slugs and snails from damaging the plants; it also helps the soil retain moisture.


Saturday 28 November 2020

What a gloomy morning

Wednesday morning I woke up, opened the curtains and saw this gloomy view down the valley facing west.


Oh No, I thought, not another overcast miserable day – perhaps I should turn on the SAD light.

Then gradually the clouds cleared, the sun came out and by mid morning the view had changed to this.


My spirits started to lift so I took a walk around the garden to see what splashes of colour were still about.

In the orchard there were a few small cooking apples left on one tree, rosy pink skin – I’ll probably leave these for the birds to eat during the winter.


In the hedge some primroses were flowering, sheltered from the elements by the elder bush growing next to them. I love their delicate blooms and scent, they are so pretty.


Surrounded by a low growing box hedge this Catananche Caeulea Major and a neighbouring Salvia Apricot Sprite were enjoying the morning sun.  Both of them are slightly tender up here and it will be a difficult decision to make when to cut down and mulch them.  But right now I think their colours are so bright and cheery I haven’t got the heart.


Down on the sunken terrace a little eryngium was glowing cobalt blue, just like lttle pin cushions.


As I walked towards Julius Caesar I could smell the scent of Coronella glauca Citrina, it seems to have been flowering non-stop since spring – a good purchase from my local branch of B&Q.


I love taking photographs of the round and shiny Sea Buckthorn berries, lovely aren’t they.

On the main lawn, I thought my large cast iron urn made a handsome portrait in the dappled morning sunlight.


On the pink border I found several plants basking in the sunlight - a delosperma


Salvia Hot Lips


And lastly I found a little Tulbaghia violacea


With the warmth of the sun seeping into my joints I made a cup of coffee then sat outside and enjoyed the rest of the morning.


Friday 20 November 2020

Not another boring "What you can do with autumn leaves" article

The garden is just under an acre in size and in one area there is a small wood,  mainly sycamore with some white beam and holly.   For two or three months every autumn, the wood produces lots and lots and lots of wet floppy leaves.


This is how T and I cope with the large numbers we get.

There must be wind eddies around the garden because in certain places large piles of leaves congregate.  They collect in corners on the drive, against the house, in the courtyard area and in a drainage gully between the house and the courtyard. In fact, they collect in large piles everywhere.


Fortunately, these heaps make the job so much easier and quicker for us.

I find the simplest way to deal the amount we have get is to have a weekly routine of raking/sweeping them up. This means that at least one day out of seven I do approximately 5,000 steps (according to my wrist worn activity counter) just sweeping up and putting them in the leaf mould store.

Here are our two leaf mould bins, T made them from unwanted broken pallets.


As you can see the bin on the left is full up to about 3 foot, the leaf mould has been rotting down since the previous year (in this case 2018 to 2019).  Incidentally, as the contents of this pile are fine and crumbly we have already started to use it around the garden.

On the right is the section for this year (2019 to 2020).  We have so many leaves which fall over such a large area that it  is not always time efficient to shred or mow over them before they go into the bin. 

Every week before adding fresh autumn leaves to the pile, I use the garden hose to drench the contents of the bin, I then sprinkle powdered compost maker on top of the pile. 


Next, I start adding newly collected leaves on top, occasionally we have to trample the leaves down to get them all in.


We do a final sweeping and raking session when we can no longer see leaves on the trees, and at the same time take the opportunity to tidy up the borders.


It generally takes a year to 18 months for the leaves to rot down to material which is friable and ready to use, however, if we use the compost maker the leaf mould is ready to use within a year.


I find leaf mould is incredibly useful stuff to have about and it’s totally free.   I put it to so many uses around the garden, once sieved I mix it with home produced compost to be used as a potting compost, I gently fork it in around plants so it can pep up the soil, or I use it as a mulch around plants.

I hope you found this post interesting and that it made you stop and think about what it’s like to own and maintain a large(ish) garden.  As with all gardening jobs, we have to think big and do things in such a way that saves time and, most importantly, doing them properly.  


Wishing you happy gardening in your own patch of paradise.